

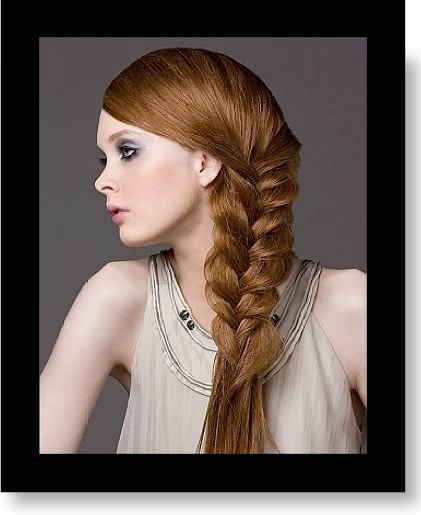
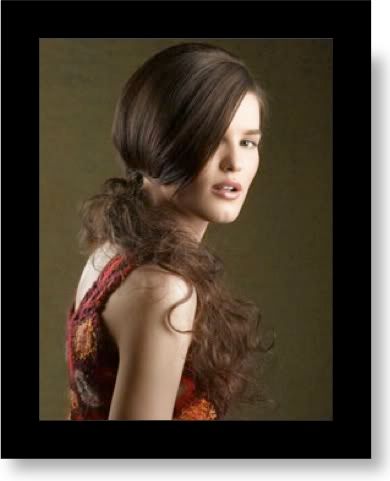
The Side Braid
 Works for:
Shoulder-length hair and longer.
Thick and thin hair (although the thicker the better)
Hair with medium to longer layers.
Girls with or without bangs.
Total time:
Average 10 minutes
This is my personal go-to hairstyle when I'm running late, having a bit of a greasy hair day, or if I simply don't have time to blow dry/straighten my hair all the way.
1. Simply side part your hair or part your hair how you normally would.
2. Divide your hair into two sections. The first section should be about 3/4 or more of your hair and the second section should be whatever is leftover. You are going to divide your hair into these two sections horizontally about 1-3 inches above the base of your neck. The top section should be the chunkier section and the bottom section should be the 1/4 or whatever that is leftover.
3. Set the bottom part aside while you braid about 2-3 times through the top section. This should be done straight back, so use mirrors or your mother or sister or roommate to your advantage for this part. 4. Then, start to incorporate the bottom layer into your braid and gradually start braiding over one of your shoulders, so that the braid falls to one side and secure with a hair tie!
Other Tips/Tricks: If you are having one of those only-have-time-to-halfway-blow-dry-my-hair days, make the time to blow dry your bangs and the very top layer of your hair. Everything else can stay towel dry and no one will know! Make sure you take a bit of hair spray on your middle and index figure and smooth out any strands that are poking out of your braid. If you have a few face framing pieces, quickly dry them and while they are still warm/hot twist them around a pencil or foundation brush handle and pin that in place somewhere while you braid the rest of your hair. By the time you are done, you will have some effortlessly-seeming wisps to compliment your beautiful face! Remember, the thicker the pencil or handle or whatever, the wider the curl. If your hair doesn't take to curls well, hair spray these pieces without making them hard.
The Side Bun
 Works for:
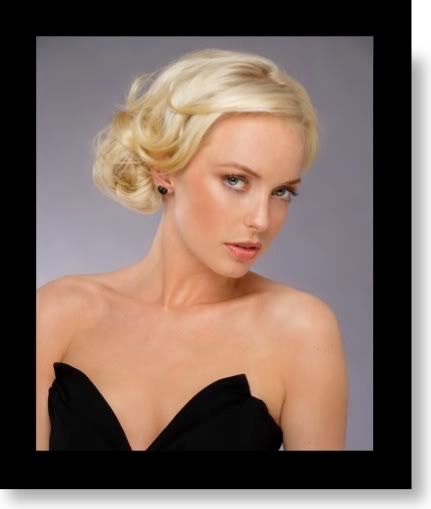
Any length that will ponytail with a little excess hair to bun.
Semi-greasy or day old hair.
Girls with or without bangs.
Total Time:
Average 10 minutes
1. If your hair is unwashed, but not very greasy you are fine. If you hair is greasy and is being weighed down by old product or oils and you don't have time to shower, use a dry shampoo on your roots. I use Ojon's Rub-Out Cleanser, which you can purchase at Sephora. If you must take a shower then do so and dry the top layer of your hair that will be exposed, and try and get the rest of your hair mostly dry.
2. You can part your hair how you normally would, but this look is really cute with a dramatic side part and the bun on the opposite side of the part.
3. After parting your hair use a paddle brush to comb your hair back smoothly. No bumps allowed! Bring your hair to the side opposite your part and secure with a thin hair tie at the base of your neck on that side.
4. Place your palms on your hair right where the hair goes into the hair tie. Gently move some of the hair away from the tie, so you create a little bit of volume. Sleek buns are reserved for ballerina dancers nowadays, whereas the bouffant is out of style. Try and achieve a natural looking amount of volume, as if you just tossed your hair in a bun and it became semi-voluptuous on its own.
5. Okay you have a few options here. You can twist the remainder of your hair until its a wound rope and then twist it around in a circular motion and secure with bobby pins for your bun, or you can braid the tail and twist it around. It really just depends on the look you want. If you have a ton of layers, it might be best to braid and use hair spray to flatten/stick in the ends that stick out then twist into a bun. If you want a messy-but-chic look, start to put your hair in a side pony, but before the final twist of your hair elastic flip your hair into a tousled nest of locks (like the picture above). Be effortless if you are attempting the messy bun!
Other Tips/Tricks: If you know you are going to only have a few precious minutes to get ready in the morning, the night before shower and use a curling mousse or serum when its towel dry. Redken has an entire line of curl-enhancing products. Throw a few braids in your hair while its about half dry/half wet. If you vary the braids in thickness, you will create a really cool tousled-meets-curly look, which is very effortlessly chic. Make sure you part your hair how you plan on wearing it the next morning. Go to bed and take out the curls in the morning! Flip you hair over and lightly hairspray the curls if necessary. Then go through the steps for the side bun, and the texture will be really cute! You can also add a cute flower pin to the side of your bun or a headband for a little extra touch!
The Twisted Pullback
 Works for:
Any length of hair so long as you can pull the front layers back.
Total Time:
Average 10 minutes (maybe more if you need to use a curling iron)
1. Part your hair in the middle. Coming from someone who has parted her hair on the side since my best friend made me in the 7th grade, I know it can feel awkward to part your hair in the middle, but for this look its essential.
2. If you have straight hair that's a day old, whip out the curling iron and haphazardly curl different pieces in your hair. As long as the ends are all curled in or out, you're fine. Perfection is not the idea of this look. If you have curly or wavy hair, skip to the second part of step 3.
3. Section off about 1 inch of hair that's in the very front of your face, right where your middle part is. Curl these pieces outward, as in away from your beautiful face. Try and coil the hair around the curling iron, and on a side note I've found 1 inch curling irons work best for this look. If your hair is already curly or wavy, I would just take a nickel size of a taming or defrizzing product that works on dry hair and use it to tame any frizz/fly aways you have from bed head. Then, section of the same pieces and proceed to step 4 (no curling iron needed).
4. Take these pieces and pin them back with bobby pins...Hair spray and go!
Other Tips/Tricks: If you have the time, this look is really pretty with feathered locks. Think Lauren Conrad meets Farrah Fawcett. Also, you can always braid the pieces you are going to pull back instead of just twisting them; however, if you are going to do this I recommend braiding at least 1.5 inches of hair. Stringy strands of braided hair looks like a cornrow you forgot to take out, ick!
The High Pony
 Works for:
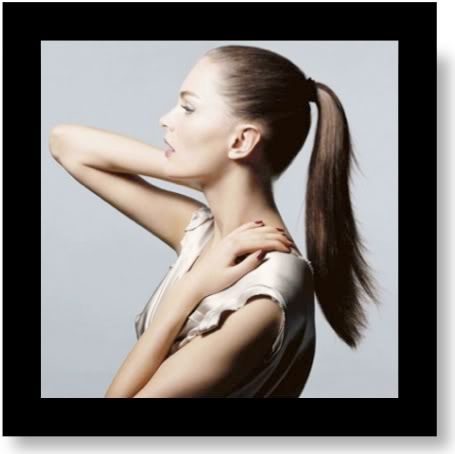
Anyone who can put their hair in a ponytail!
Dirty or greasy hair.
Dry hair (sorry girls, no wet hair allowed).
Total Time:
Average 5 minutes
1. Gather your hair in a ponytail near the top of your head! You can either maintain your part (I recommend a side part of you are planning on doing this) or you can brush everything back. This does not have to be perfect, just avoid any major bumps or loops of hair sticking out. If your pony is looking kinda funky as far as kinks and whatnot go you can either a. grab a straightener and run through it really quick (it does NOT have to be perfect) or b. put a bit of styling mousse in your hair and either scrunch it or twirl it with your fingers/brush handle.
Other Tips/Tricks: Put a headband in your hair if your hair is a little frizzy or bedheady (is that even a word?). Also, adding a flower or something at the base of your pony can be really cute. Also, sleek ponytails aren't in style and no one likes their hairline being tugged back, so take your hands behind your head and with your fingertips gently scoot your hair away from the pony for a big of extra/natural looking volume. If your hair is weighed down with old product or grease, use a dry shampoo at the roots. Comb through and after about 3-5 minutes put your hair in a pony. Make sure you let the dry shampoo set and soak up all the ickiness you don't want. This will also give your hair a little bit of body as opposed to just hanging flat.
Tousled Low or Side Pony
 Works for:
Hair that will hold a wave and/or curl.
Hair long enough to ponytail.
Total Time:
Total Time:
Average 10 minutes
1. If you know you are going to be rushed in the morning, take a shower at night and when your hair is towel dry apply a styling mousse, preferably one with curl enhancers. Now, if you are like me and can go to bed with damp hair and wake up with it tousled, then go to bed! If not, put your hair in a few braids for a textured ponytail.
2. When you wake up in the morning use a styling mousse to separate and defrizz your tousled or curled locks.
3. Secure in a low pony about 1-2 inches above the base of your neck or secure on one side about 1 inch from the base of your neck. No high side ponytails allowed! The 80's are over ladies!
Other Tips/Tricks: Leave a few wisps out for a cute "meadow girl" look. Au naturale is in!
Here is another great resource. It's a slideshow that was originally made by the beautiful people at Marie Claire and is brought to you by Real Beauty. There's something like 40+ hairstyle tips on there with product recommendations!
all photos are from your-hairstyles.com, runningwithheels.com, hairjunky.com


2 comments:
Ah scared to try the middle part haha feels so wrong. But love the other looks and as a lazy bum i find the side braid and low side pony tail total lifesavers.
Haha I totally know what you mean about the middle part- but think about the Kardashians. All three sport the middle part and it looks amazing! It's probably a matter of face shape you know?
Post a Comment